Make a Cardigan From a T-shirt!

Cardigans are total wardrobe workhorses. Need to ward off chill in an office that’s set to “Hoth” on the thermostat? Grab a cardigan. Want to cover up less-than-buff arms in an otherwise darling tank top? Grab a cardigan.

I’ll admit, my wardrobe has more track jackets than cardigans at the moment. But lately, I’ve been wanting more retro and girly ensembles, and a track jacket just won’t do over a floufy, froufy dress.

But, to keep up with the number of cover-ups I need to match all. the. things., I’d need a king’s ransom to buy cardigans or even fabric to make them. But then, as I was pondering this problem of never having enough cold hard cash to finance my fashion fantasies, an idea occurred to me.

T-shirts.

I mean, I am no stranger to the T-shirt makeover game. But I realized that I could find long-sleeve T-shirts for SUPER cheap at thrift stores and discount stores, and with just a little finagling, kablam! Cardigans galore!

So far, I’ve only made two, so it’s a little shy of that “galore” claim, but rest assured, there are several more in the near future. Here’s how I made mine:

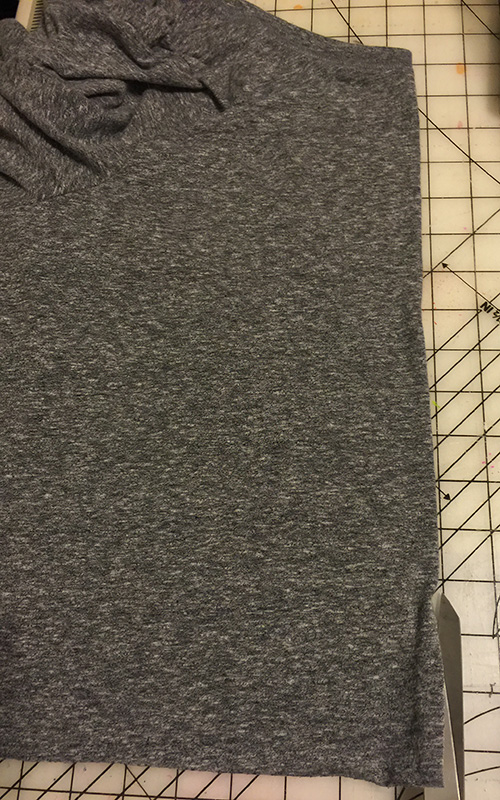
First, I had to cut a little off the bottom of my shirt. It was a super-soft ladies' cut that I got two sizes up so I'd have room for seam allowances and the like, but as a consequence it was too long for me. But I kept that cut off section at the bottom!

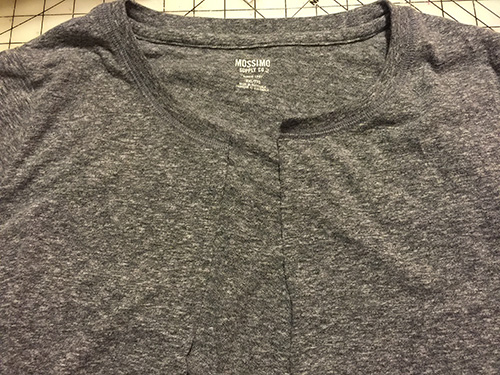
Next, I carefully cut open the shirt along the front center fold.

Here you can see the center cut open:

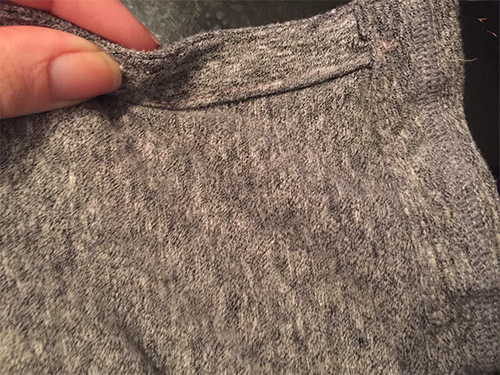
Remember that piece I cut off the bottom? I cut a strip about 2 inches wide, and I used that as a facing for my front edges. I folded it in half lengthwise, and then folded in one end to have a clean finish at the top (neck) of the seam. I stitched the folded fabric to the front openings, matching up all raw edges, using a 1/4-inch seam allowance.

Then I folded the seam allowance toward the facing and understitched it.

For my bottom hem edge, I did the same thing that I did with the center front edges, except I used the hemmed edge from the original shirt, so I didn't fold it. I also understitched it.

To finish the shirt all the way around, I folded under my facing and stitched it into place. From the inside, you can see that particularly along the center front edges, you have a nice set of double stitching on the inside.

Then I marked the placement for my buttons and buttonholes. I just used a water-soluble marker and measured out the distance between the buttons based on the number I had and the length of the cardigan. You can kiiiiiinda see my blue marks in the photo below.

Then I just used my machines buttonhole setting to stitch those in place, and sewed my buttons on by hand. Ta-daaaa! Super soft and shockingly lady-like cardigan. Including buttons, it cost about $11 in materials.

I also made one using a men's XL T-shirt. For this one, I literally laid out the gray one on top of the black and cut it down to a ladies' cut, leaving the neck binding intact. (That meant I had to close up the side seams from where I cut the shirt narrower.) Then I finished it exactly as this one, though I had to hem the sleeves because I wanted them 3/4 length. To add a little nerdery, I used Heat'n Bond to make a BB-8 applique using a scrap from some licensed Star Wars fabric I had on hand. I fused it to the finished cardigan and ran a satin stitch around my applique. The shirt on this was about $5 -- I bought it for another project and never used it. And the buttons were in my button box, given to me about a decade ago by a former coworker. So it's practically a free garment, in terms of materials! (I wore this to the opening of "The Force Awakens.")


And that's that! I see many more of these in my future, with more nerdy appliques and maaaaybe even some color blocking.


The Double Agent Skirt


When it comes to movies, especially franchise movies, I almost always find myself rooting for the good guys ... but envying the style of the bad guys. Why do villains have such fabulous fashion sense?

Because I can't seem to decide which side I align with completely, I decided to make a Marvel universe skirt that enables me to switch my loyalties on a whim. It's my S.H.I.E.L.D. and Hydra Double Agent skirt! Here's how I made it:

Materials:

- Quilting cotton fat quarters in red, black and gray (prewash them!)

- Skirt pattern (I used an old favorite; almost any pattern you like will do.)

- Enough fabric for the skirt, plus a little extra (You'll be doubling the front.) I used a ponte de roma knit, but anything that can take iron heat will work.

- Small piece of black cord elastic

- Four buttons


First, I printed out the S.H.I.E.L.D. and Hydra logos. I made them big enough to fill the width of a sheet of standard paper, but you could of course go bigger or smaller, depending on your taste.

Once I had my designs printed, I traced them onto HeatnBond iron-on adhesive, drawing on the paper side.

-

-


For the S.H.I.E.L.D. logo, I switched the direction of the bird's beak so it would be facing the right way in the finished project.


Once all my tracing was complete, I fused blank pieces of HeatnBond to pieces of fabric a little larger than the circles of my designs.


I used my original printouts to trace circles onto the paper backs of each of my base pieces. For my S.H.I.E.L.D. design, this was a gray piece. For my Hydra design, the base circle was red. After I traced my circles onto my base fabrics, I cut them out BUT DID NOT PEEL OFF THE BACKING PAPER. (That's vital to remember.)

Then I fused my design pieces for the S.H.I.E.L.D. logo onto the back of a piece of black fabric, and carefully cut along the lines I made in my tracing.

With all my pieces cut, I carefully arranged the pieces onto the gray base circle.

Once I had my pieces lined up, I ironed them into place. To make sure I didn't accidentally shift my design pieces around, I first gently pressed them from above only -- no moving the iron around once it had touched the fabric. This lightly fused the design in place, and then I more thoroughly ironed everything.

For the Hydra logo, I cut a black circle slightly smaller than the red base circle out of fused fabric, and ironed it to the center of the base piece.

Next, I fused my traced Hydra logo onto a piece of red fabric, and carefully cut it out. Those bumpy tentacles take some patience!

I arranged and ironed on the skull and tentacles design the exact same way I handled my S.H.I.E.L.D. logo, carefully and gently apply heat to set the design before ironing for a thorough fuse. Then my two logo circles were ready!

OK, I'm not going into deep detail on the making of the skirt. Basically, I made a skirt that I've made a million times, but I didn't install a zipper in the side like normal, and I made two front pieces instead of one. I stitched a front piece to each side of the back, and finished all the edges. (I basically just hemmed all around, including a little bit of elastic along the top waistband edge.) Almost any skirt pattern you like will work for this. Mine has a yoke and a slight flare, but a pencil skirt would be super fab, too!

To make the closures for my skirt, I stitched a loop of elastic on each end of the waist, and then I stitched two buttons on each side seam, one on the outside and one on the inside. That way, I can close the skirt with either front showing.

I peeled the backing off of the base of each of my large insignias, and ironed one to the front edge of each side.

To secure the logo appliques, I zigzagged around each element with matching thread, carefully following the designs. (The Hydra logo was once again a bit more challenging than the S.H.I.E.L.D. logo.)

As a little tip: I often find that I have to leave a project to run an errand, or work on a different project for a little while. Because my machine automatically resets to its default stitch whenever I shut it off and turn it on again, I take a picture of the settings the way I want them for any applique I'm doing. When I return to the project, I have a reference for my settings, so everything will stay uniform.

After working my way through all the applique stitching, everything was done! Now I can defend the world as a S.H.I.E.L.D. agent ...

... or hail Hydra. It just depends on my mood.

Of course, I see some other opportunities for this design on future skirts. Rebel Alliance versus Empire, or Resistance versus First Order are probably not far behind this one!

In the mean time, keep having a fabulous Nerdvember!


Glam Gourds: Quick and Easy Lace Pumpkins

Halloween is almost here! I find myself a little behind schedule this year. I always mean to really turn out the decor, but costume projects and life's hectic pace often derail me.

But it's not too late! You can whip up some fun pumpkins to add a little new All Hallow's Eve fun to the house without taking too much prep time.

Lace to the rescue! I love playing with lace. I have fond memories of draping it over things as a kid and marveling at the way it obscured them but also revealed new designs. Why not turn that magical transformative power loose on a few pumpkins?

For my first pumpkin, I wanted to wrap it with a piece of charcoal lake that looks a little like cobwebs. To calculate the size of the lace circle I'd need to wrap my pumpkin, I first measured around the fattest part of the pumpkin.

I cut a circle a bit bigger than my measurement. Since the pumpkin was 18 inches from one side of the stem around the bottom to the other side of the stem, I cut a circle 20 inches in diameter. Then I ran a quick running stitch around the outside of the circle.

As my circle gathered from the stitches, I snugged it up around the pumpkin.


There was a little slack in my lace once I pulled it up around the pumpkin, so I ran another round of stitching around the stem to tighten it up.

Then, I started working my way up the excess lace, stitching in circles around it. This created a fun, uneven stem out of the lace edges.

And here's my lacy pumpkin! This is a great treatment to do on real pumpkins as well, since you can unwrap them and use them for baking once you're done using them for decor. If you're careful with removal, you can also keep the lace and use it again next autumn.

It being the Halloween season, I can't stay away from spray paint. It's like a staple of creative fun for me. This time I used another piece of the cobwebby lace and just wrapped it around a white pumpkin, securing it at the base with a rubber band. Then I sprayed black paint over the whole thing and let it sit for a little while.

When the paint was dry, I peeled my lace off the pumpkin and had a super groovy piece of pumpkin art. I like to think that if Dr. Frankenstein had decorated his lab with pumpkins, this one would be right at home there. (It's truly one of my fave pumpkins of all time.)

I spray painted another pumpkin using a different lace as a stencil. The textile is a little too thick to wrap around a pumpkin, so I worked in sections, draping a small piece over one area of the pumpkin at a time and then working my way around as the paint dried. I think if you started with a black pumpkin and used brown and copper-colored paints, you could end up with a cool leopard look! I love the swirls on this one.

I hope all of you have a safe and happy Halloween, filled with fun and creativity and all the delicious treats you can handle. Happy haunting!


Captain America Pillows

This project is an intersection of patriotic decor, comic book fun, and even a little bit of play time. These will majorly upgrade your pillow fight game, if you're into that sort of thing. Make these fleece pillows for kids of any age! It's also a good project for kids who are learning to sew, since fleece is forgiving and easy to work with. It's not a precision project. All you need is fleece in red, white and blue, plus thread and a bit of Poly-fil. If you get 2/3 yard of the red and blue, and 1/2 yard of white, you will have more than enough for both pillows.

To get started, I used my opaque projector to throw images of the shields onto poster board taped to a wall and traced them. You can totally freehand them, though. (I'm just not very good at freehand work.) For size reference, my circular shield ended up 16.5 inches in diameter, and my other shield sketch is about 15 by 21.5 inches.

Once I had my designs roughed out onto the poster board, I cut them out, leaving a little extra around the edges.

I separated out all the circles for the round shield, then cut a circle of red fleece for the base, and cut each subsequent smaller circle so I could layer them all on top of one another. This gives it a little bit of a convex shape, just like Captain America's shield.

For the longer shield, I cut the base in red, but then cut off the top band detail of my poster board tracing and used that as a pattern piece for blue fleece. I appliqued all my star pieces on their blue backgrounds (for both the circular and elongated shields) before doing anything else.

Then I layered those blue pieces onto the next red layer. I use fairly long stitches throughout the projects to prevent distorting the fleece.

For the circular shield, I then proceeded to layer my circles together to build up to the full width. Once my blue star band was in place on the long shield, I cut white stripes (mine were about 1.5 inches wide) to applique onto the red base, then I pinned them in place and stitched them down.

I cut my backing pieces for both shields out of blue fleece, and cut two 11-by-9-inch strips out of blue fleece as well. I hemmed the 9-inch edges by simply folding them under and stitching, and then stitched the unfinished edges to the pillow backs -- these create sleeves to run an arm through so that the pillows can be used as soft play shields.

Once the backs were ready and the fronts were completed, I stitched the fronts to the backs, wrong sides together, leaving an opening for stuffing. (That's correct -- no turning! You stitch them together right side out!)


Once my shields were stuffed with Poly-fil, I machine stitched the openings closed, and voila! Ready for comfy superhero snuggles ...

... or battling Hydra. Whichever you choose.


Pattern Hack: A Jacket Fit for a Snow Queen

I love Elsa's ice blue signature dress, but for me, the real style magic for the ice queen is in her coronation gown. The jewel tones and simplified rosemaling motifs are just delicious. So I decided to make a little sweatjacket for myself based on the design of Elsa's beautiful dress.

I started this jacket with a tried-and-true pattern. I am not even sure how long I've had this one, but it's been the basis of many projects. It's out of print, but any jacket pattern you like can be adapted.


I first laid out my two front pieces together, and drew a design line to mark out where the color break between the black and teal would go.


Using that line as a guide, I traced my pattern to create the separate upper and lower elements of each piece. I added a 1/4-inch seam allowance ONLY to the upper sections that would be cut in black.


Once my pieces were cut, I fused small teal, berry, and light blue satin pieces to Heat'N Bond. Then I cut out a basic version of queen Elsa's design elements. I just freehanded mine, using movie images as a guide, cutting a mirror for each piece after I had the initial shapes where I liked them. Here are my shapes laid out on my fabrics prior to fusing:


One note: If your jacket pattern has pockets like mine does (and you want to keep that design detail), test the layout of your pieces to make sure the designs sit above any stitching lines your pocket may require. You can stitch through the designs after they're applied, but I prefer to preserve the design lines of my hard work!


Once I had fused my design pieces on, I stitched around each of them with a zig-zag stitch. I also placed the teal pieces over the black upper pieces with a 1/4-inch overlap and stitched them into place.


Then I joined my center front pieces to my side front pieces. As you can see below, my teal sections don't match up perfectly at the seam. But as trim goes over this line, it wasn't a concern.


I used a scrap of gold taffeta to cut a bias strip about 1.5 inches wide and long enough to go all the way around my jacket. (The back is pieced with the teal and black just like the front.) I pressed the raw edges of the trim under to create a strip about half an inch wide, and I stitched that over the line where the teal was joined to the black. I had stitched my back and front pieces together before attaching the gold trim, so I was able to apply it in one continuous line.


After that, it was just a matter of setting in the sleeves and zipper. For the top stitching along the zipper on each side, I switched out my top thread colors as I went, so I used mostly teal, but then a little gold and a bit of black as I came to those sections, just to keep the look a little more elegant.

I also cut a basic mandarin collar to finish the neckline. I had debated about including a pale yellow hood to mimic Elsa's hair, or a magenta capelet like the one she wears in the film, but I was so delighted with the clean lines of the jacket that I opted to keep things unfussy.

And now I have a fun jacket that "Frozen" fans will immediately be able to identify. For anyone not in the know about the kingdom of Arendelle (do those people exist?), it will probably just look like an embellished jacket.

I love that it's sporty, but that I'll also feel like royalty when I wear it! ;)


Hello, world!


Welcome to Sew-Nerdy! For the last several years, I’ve been a contributing sewing blogger for various outlets, which has always been a really fun way to share creativity with the world. And while I’ll continue to do that to some degree, I also wanted a place where I can just post whatever sorts of projects I want without having to conform to anyone else’s content rules.

And, as it turns out, most of the projects I want to do are nerdy, thus the moniker. So, you can expect lots of stitchery inspired by things like movie franchises, history and science. Sometimes you’ll get tutorials, sometimes just photos of finished projects, sometimes just some bit of ephemera I find inspiring.

I hope you enjoy it!


-H